And besides, as I was already in the process of transforming our garden into a hippy permaculture zone, why not add a mud oven?
 |
| Yes- that is a unicorn with a sparkling glitter horn |
So we looked up some info on the internet, here are two good sources: 1 and 2 that we referenced.
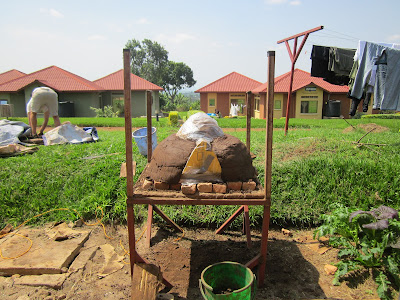
We started by making a table with the help of some of the maintenance staff workers. Then we created a mixture of clay and sand. All the blogs talk about special mixtures of clay and sand... we just kind of took our wheelbarrows and shovels around to random areas in the village to find sand and clay soils. The instructions from the blogs are to make a mixture that doesn't splat if you drop a compressed ball (50 times in your hand) from waist height. It should deform but not break. We used this mixture to make a border around the table. We filled in the inside with a layer of sand and then put bricks ontop of the sand layer. If I were to make another oven in the future, I might make the this lower layer thicker, or even make the oven stand out of bricks for more thermal insulation.
 |
| Sand dome on our table |
 |
| Sand dome from the side covered with plastic with a door |
 |
| First layer of mud |
 |
| We pressed our fist into the side of the mud layer to make sure it was thick enough |
I think we made our mud/sand mixture with a bit too much clay and water so it squished down too much. As a result the bottom layers of our oven are very thick but the top layer not so much. After the outside had dried for a day we cut out the door. We let it harden for a few more days and then took out the sand from the inside of the dome. And then.... we made delicious treats!
 |
| The first (of many) banana bread made in the oven. After 7 months without... |
It took us a little while to figure out how to get the oven hot enough for good baking. There were many (sad) failures. What you need to do is get a raging fire going in the oven fore 2 hours before baking. The smaller the wood, the better. You also need to babysit the oven because it has a tendency to go out or smoke horrendously. This might be because our door is not quite a the right ratio?? I still don't know the answer without more experience with other ovens. It is supposed to be 63% of the interior dome height. This is what it is for us... but maybe it needs to be more to get a better draft.
Also you need to let the fire burn down and/or sweep the coals out depending on what temperature you need for baking. We don't have an oven thermometer but sometimes if you leave the coals in, you could burn your baked goods. Also it is important the let the fire burn down completely unless you like that smoky flavour to your cake. We usually measure if the oven is hot enough if the base of the outside dome is warm/hot to touch.
The oven works by stored heat in the mud. It gradually cools down and cooks your food as it does. If I were to do this again I would add an insulative layer with chopped dry grass and the mud mixture (like cob) to keep more of the heat in longer.
 |
| mmmm bread |
You can usually get about 2-4 items in at a time depending on the size of the pan. We have cooked normal bread, challah, gluten free bread, carrot cake, brownies, banana bread, buns, chicken, baked apples, honey cake, sweet corn and cookies. We usually shut the door with a combination of bricks and pieces of wood to keep the heat in.
Since the oven is made out of mud, we needed a shelter to protect it from the rain. With Cyprien's help, we have this great shelter made out of spare sheet metal. We also decided to make this mural on the oven... to really share the love. A rainbow, Gaia, jumping dolphins, sunshine, and a unicorn in a sparkling magical landscape. oh yes.
Enjoy the sweetness of our oven!! May 2013 be filled with many delicious treats.


