"Trees and plants always look like the people the live with, somehow"- Zora Neale Hurston
When you walk into someone's house or their room you can tell alot about that person. How it is organized, the items that are displayed, etc. When you walk into someone's garden it is the same thing. I realized this at Linnaea when each student had their own farm plots to experiment with. Walking into each persons garden was a reflection of their personalities. It is quite amazing to see.
So here is a walk around the gardens at ASYV as well as my garden, and you can be the judge on what they say. It is also a bit of an instructional manual for whoever inherits this garden next year.
 |
| Guest House 1 |
The gardens at guest house 1, administration and the inner village circle are some of the best maintained gardens in the village. In the rainy season they are full of flowers like roses, marigolds, geraniums, irises.
They are also the places that you will find secret plants from elsewhere hidden within all the decorative hedges. Karasira is the the head gardener here and he definitely has a green thumb. As much as he loves the manicured hedge and grass look, he also is a garden experimenter. There are some lemon trees, loquat trees, pomegranate tree, sage plant and even a couple fig trees to be found if you know where to look.
 |
| Orange club house with hedges |
 |
| Family house with rocky washing area, lemongrass and hedges |
 |
| Hedges and lemongrass |
 |
| Family house with some fruit trees in the front, surrounded by hedges |
The family houses all look pretty similar. Many, many hedges, some lemongrass and some trees planted around the house. In a few houses there is a bit of diversity- but mostly ornamental hedge work with rock paths. This is also the aesthetic of Rwanda. Hedges, hedges and more hedges.
 |
| Staff House |
The staff houses were all built last year. As such, when we arrived there was no landscaping. But also 12 months later there is no landscaping (well not exactly, all the houses got hedges). Above is an example of a staff house with some hedges around the perimeter and bare ground.
Needless to say, after a little while of seeing what would happen, I took matters into my own hands. 'The problem is the solution'- right?! As a gardener, the thought of leaving bare soil exposed to grow weeds and leach nutrients for 12 months is uncomfortable. I had to fill it with something!
It all started with a passion fruit plant in front of our window and it literally blossomed out from there.
 |
| Passion fruit vine in front of our room window |
In the village there are not alot of private spaces. There are people around everywhere. And although maybe Rwandans don't need that much time to be alone, because they grew up with people everywhere- in my country the density is not really that high. There are lots of places you can go without seeing many people, even in a city.
So the passion fruit vine fills multiple functions: delicious fruit, privacy screen, wildlife habitat(the birds love drinking the nectar of the flowers), beauty, and shade. In the beginning of the year we found our room to be very hot at night, and the passion fruit vine as well as the garden around the house help to make a cooler micro-climate. I also have vegetable start trays under the passion fruit vine because it provides shade and blocks the heavy rain.
 |
| Veggie starts under passion fruit vine, nasturtium, marigold, mint, lemongrass, arugula going to seed, hot peppers, comfrey, basil |
Nasturtium is a tasty (and peppery) treat in salads. You can eat the orange flowers as well. Lemonbalm is a herb you can use in tea- it's good for an upset tummy and anxiety.
 |
| Lemonbalm, lettuce, kohlrabi, sweet peas, dill, garlic chives |
 |
| Tree tomato, sesbania, guava, mango and mulberry trees |
I planted a little orchard in front of our window on the grass. These trees will give fruit, shade, privacy screen and and create a cooler micro climate.
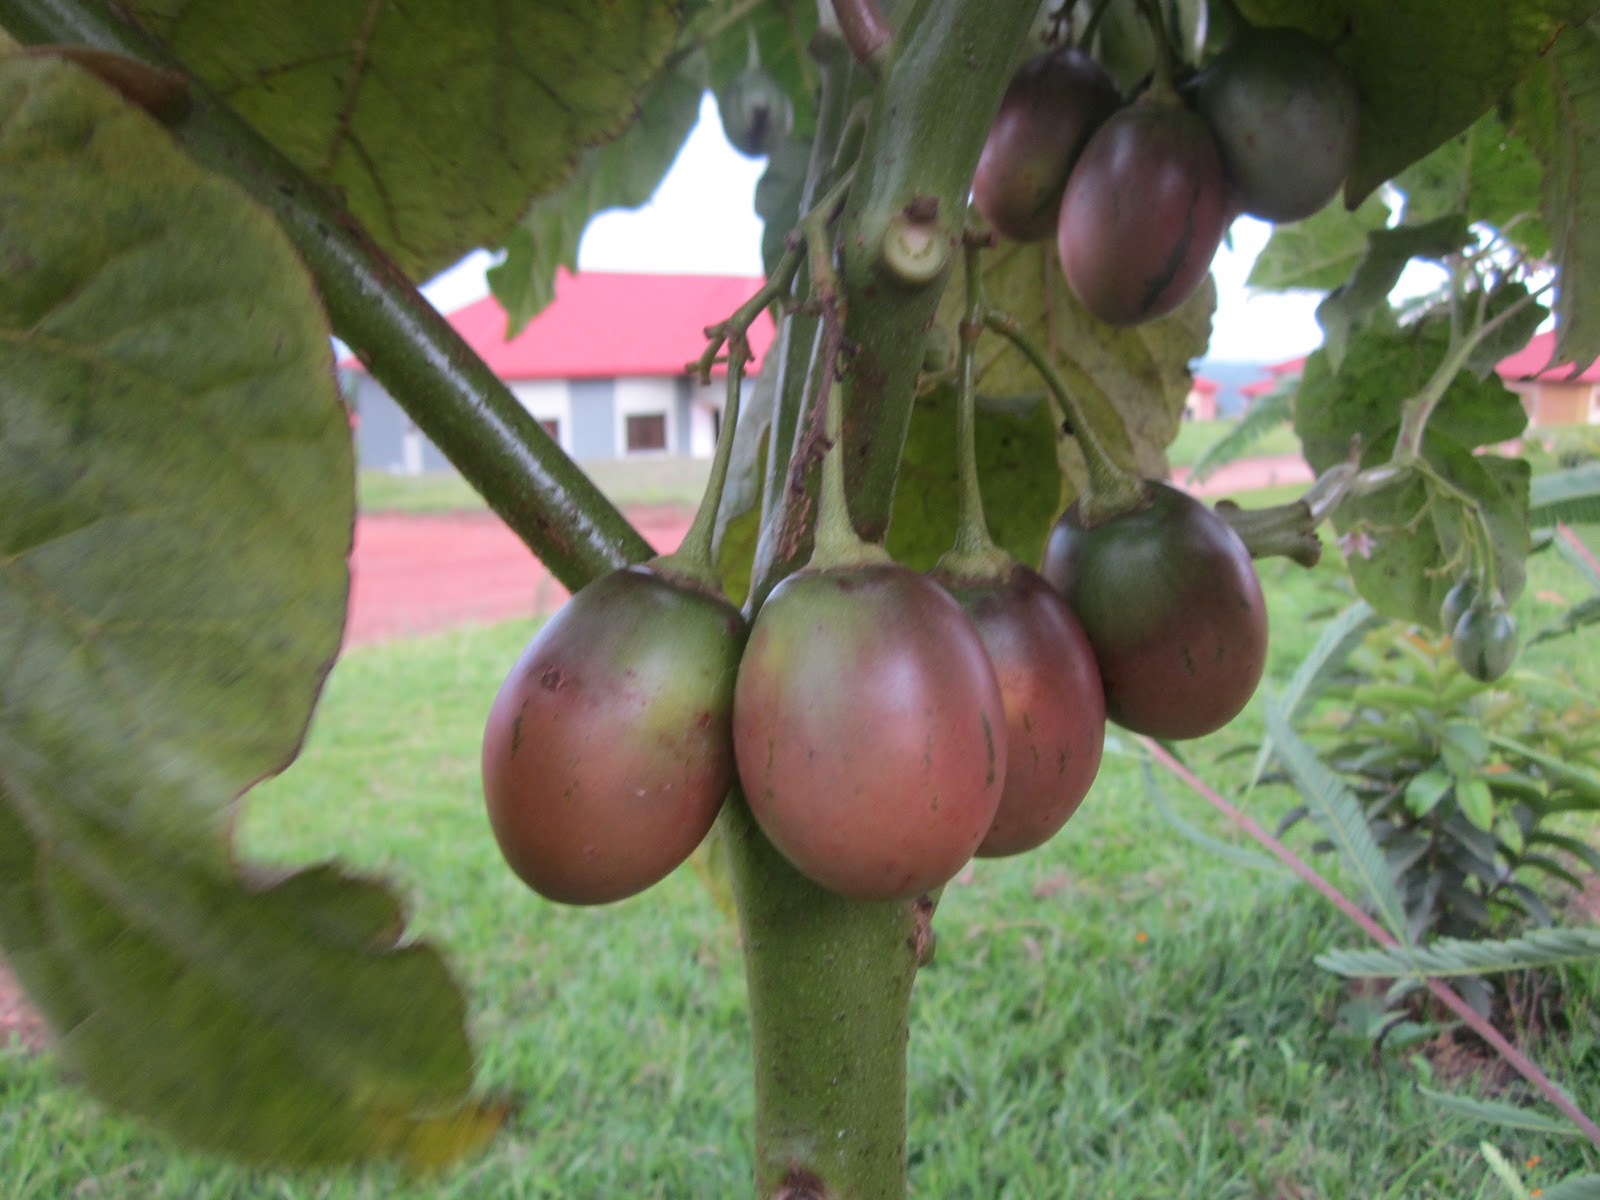
 |
| Tree tomatoes ripening |
In this next picture you will see lettuce, tephrosia (
Tephrosia vogelli), basil,
Ocium gratissimum, cilantro, compost pit and water harvesting area.
 |
| Compost pit outside the kitchen window with grass pile right next to it |
Tephrosia is a nitrogen fixing plant that grows into a bush shape. You can cut it down periodically and use the leaves as mulch to feed the soil. In addition, tephrosia can ben used as a natural pesticide. Just take the leaves place in a bucket to ferment for a 1-2 days, remove leaves, add a bit of liquid soap and voila! You can also use the liquid to control ticks and insects on livestock. Tephrosia is so potent that is is also know as fish poison- it stuns the fish making them easier to catch. For more info on the uses of tephrosia check the world agroforestry site
here.
Ocium is a genus in the mint (Lamiaceae) family. Basil and tulsi are in the same genus. Ocium is strong smelling and good for making tea to soothe the stomach.
 |
| Hot compost pile on the veggie bed |
Many Rwandans who have come on tours of my garden say 'wow you must be using some nice chemicals' NOOOOOOOO!!! No icky chemicals allowed. Only the magic of compost.
There is a hole outside our kitchen window where we put all our organic waste (veggie scraps, old food, fruit peels etc). If we are going to get nerdy here- for relative location, it is aptly positioned so that you can just chuck your peels out the window while in the kitchen. The area right beside it is a storage area for grass. I usually snag some when they are cutting the grass near our house. I layer grass with the veggie scraps to have a good carbon to nitrogen ratio.
Once the hole is filled I generally make a hot compost pile with it. Although you can just let everything rot, the hole method tends to produce anaerobic compost- which is ok, but aerobic is filled with much more benefical organisms. I usually move the materials to a garden bed or on the grass to make the compost pile. It is best in a shady area, but there is not that much shade around the house yet. I layer the materials from the pit with dry grass, let it sit, and turn it every so often. For more information on how to make a hot compost pile go
here.
Once the compost in the above bed is finished it can be distributed into the garden and the bed can be used to plant veggies again.
 |
| Water harvesting area |
The tap you see in the picture above is the tap where everyone does their laundry. This also means that instead of lifting a heavy basin of soapy water to the sink, everyone just dumps the soapy water next to the tap. Soapy water can be a problem because it can change the pH, salinity and water log the soil. However, if it is placed into deeply mulched areas in healthy soils, and directed to water loving plants, some of those problems can be mitigated by the soil life.
Next to the the tap I put water loving plants to soak up the extra water. There is papyrus, taro, comfrey, mint and papaya (sorry- unfortunately this one turned out to be a male papaya tree). There is also a ditch where the excess water will go (or can be dumped directly there). This ditch is planted with comfrey and a banana.
 |
| Laundry ditch planted with comfrey and banana |
All the beds are mulched with grass collected from the lawns around the house.
 |
| More veggie beds with nitrogen fixing helpers |
 |
| Eggplant, passion fruit, pepper, cilantro |
 |
| Aloe and scarlet runner beans |
The aloe came from the Nature Park. It was the unfortunate victim of a vigorous trail cleaning one day during Saturday service. I tried to replant it in the Nature Park, but it was the long dry season and it wasn't taking. So I took it down to the garden and nursed it back to health. Now it is doing great. When it goes to seed, the seeds can be planted in the Nature Park.
 |
| Sweet peas, ground cherry (Physalis peruviana), lettuce, kohlrabi, lettuce, basil, flowers |
The sweet peas for some reason have been slow in flowering. There are some that have started and hopefully they will create beautiful sweet smelling blooms (note: you can't eat the 'peas'). The ground cherries are sweet orange berries. They have many other names- cape cod gooseberries, poha berries, golden berries etc. They are ripe when the husks dry and the fruit is an orange colour inside. The scarlet runner beans are delicious raw or cooked, they grow quite big before becoming hard and stringy.
 |
| Bananas, mulberry tree, papaya tree, lettuce, greens, ground cherries, dill, cilantro, carrots, tephrosia, comfrey, sesbania, taro, papyrus |
This area is a huge drainage area for the roof. On this side of the house, the downspout goes directly into the garden and floods everything- including the living room on really heavy rains. I planted bananas, taro, papyrus, mulberry and papaya to try to soak up some of this extra water. I also made a swale (ditch) to direct the water to the bananas and away from the living room.
 |
| The ditch in action during the rain |
 |
| Hole filling with water from the rain behind the banana |
 |
| Water captured in the ditch |
The water ditches go well with the principle of catching and storing energy. Instead of letting the resource and also the energy of the water go to waste (and potentially be destructive to our house and garden), I created a channel for it to flow. This way it can benefit the garden system.
 |
| Sesbania sesbans |
The above Sesbania trees were planted in April and are now as tall as the roof. The seeds were collected from Kenya. Sesbania is an excellent agroforestry and permaculture tree. It is nitrogen fixing, responds well to cutting, provides good fuel wood, high quality forage, and shade. It also grows well in wet soils. I grew it around the house for shade, privacy, and soil improvement. For more information go
here.
 |
| Sesbania and friends |
 |
| Tree tomato, sesbania, lettuce, asian greens, arugula, chard, kale, passion fruit, watermelon, carrots, mulberry tree, flowers, sweet peas, basil banana, papyrus |
 |
| Banana and baby papyrus getting watered from this down spout |
 |
| Mulberry line and sesbania with some errant hedges |
oh hedges... I fought the good battle- but there are still some around...
 |
| Sweet pea |
I hope at least one person out of the six volunteers that will live in this house next year will have some inclination to keep this garden going. Yes it will take a bit of work- but mostly it is just maintenance now. It can also be quite an enjoyable and meditative activity. I have also planted lots of perennials so they should give yields without as much care and attention as a typical garden with annuals.
The dining hall food is great- but at some point in the next year you are going to get tired of rice, beans and more starches. Having some fresh fruits and veggies that you grew yourself (not to mention the herbs!!) really breathe some life into your experience at the village. Veggies that you can eat raw or lightly steamed is amazing after eating very boiled vegetables from the dining hall. I have left a couple garden maps in the house for your use. Please enjoy!
“The single greatest lesson the garden teaches is that our relationship to the planet need not be zero-sum, and that as long as the sun still shines and people still can plan and plant, think and do, we can, if we bother to try, find ways to provide for ourselves without diminishing the world. ”
-Michael Pollan, Omnivore's Dilemma
Also check out this
great article about 'What Permaculture Isn't and Is' by Toby Hemenway


.JPG)


